

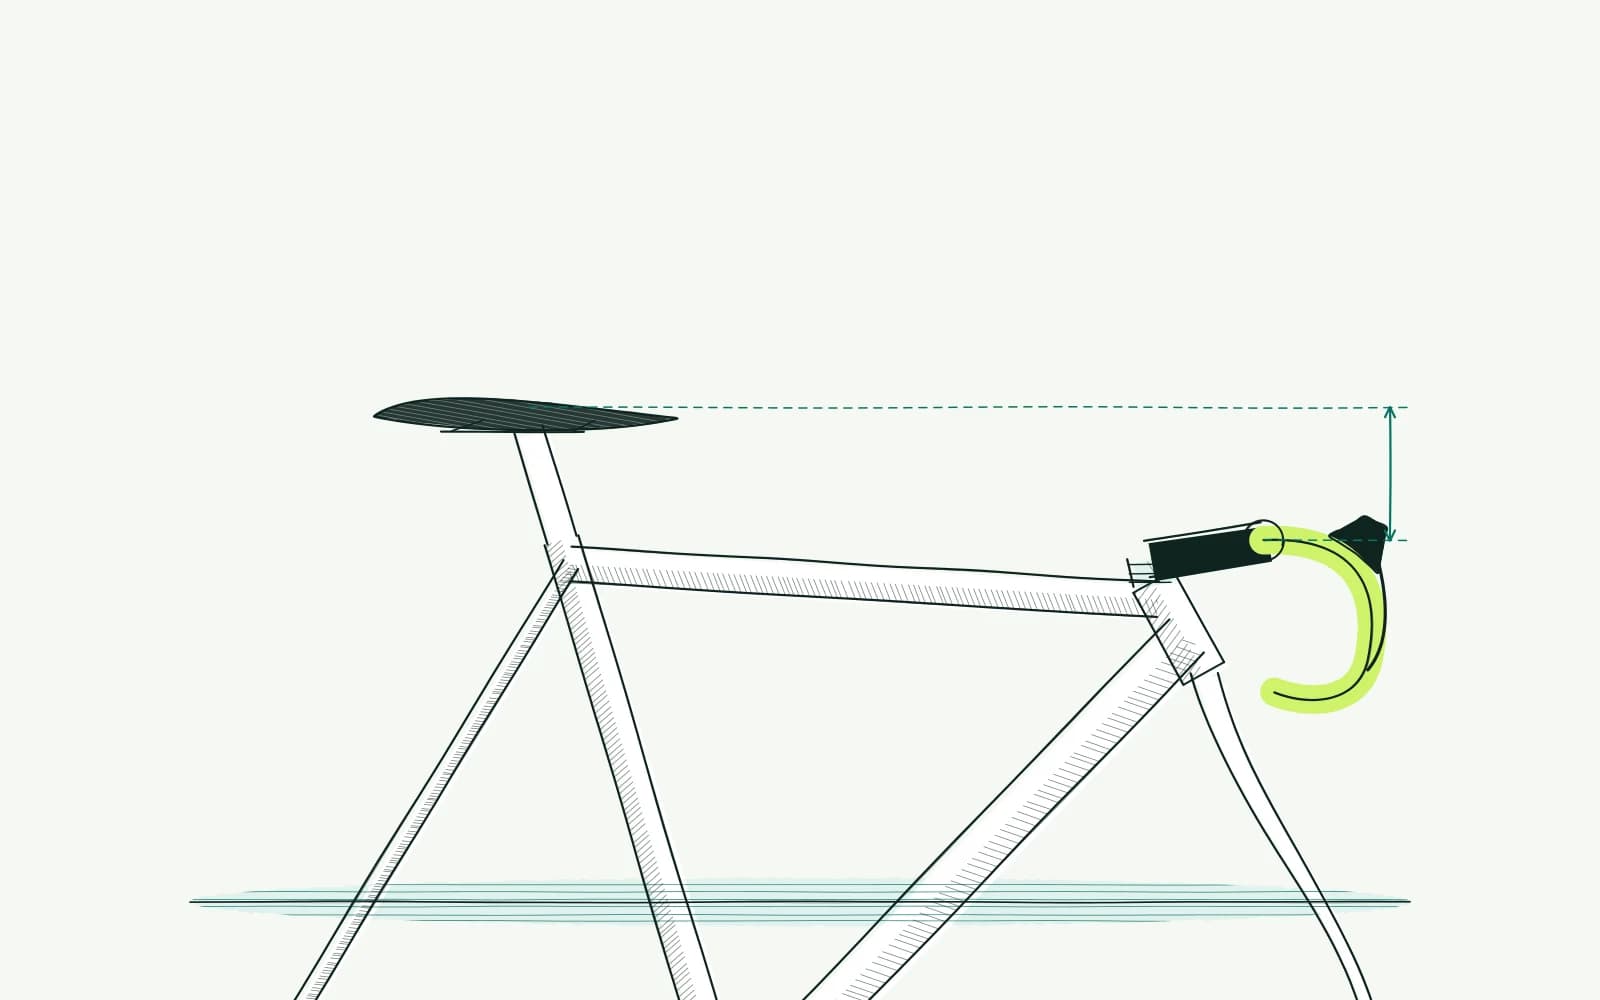
The problem: handlebar drop
You see a low racing position and wonder whether your bars should move down too. Or pressure on your hands makes you want to sit higher. Both questions start with the same check: can you use the position comfortably throughout the rides you actually intend to do?
Perhaps the tops and brake hoods feel comfortable, but you rarely use the drops. Height may play a part, alongside bar shape or reach. The word drop can also describe the shape of a handlebar itself. Here we mean the height difference between saddle and bars.
Record which hand position triggers the problem. Note difficulty looking ahead, tense shoulders or restricted movement while pedalling. A photograph of the height difference alone cannot tell you which factor matters most on your bike. Keep these observations separate from assumptions about how a road bike should look.
Background
Your contact points establish your position together: saddle, pedals and hands. Moving one point can change support elsewhere. Higher bars may make a less deeply inclined torso easier to maintain. They do not replace a stable saddle position or brake controls that you can reach and use properly.
Drop and reach are different dimensions. Drop is vertical; reach concerns horizontal distance. Raising a handlebar may also bring it closer, depending on the installation.
Record both effects when changing spacers or a stem. Do not describe a trial solely as a height change if distance changes as well.
Frame geometry establishes part of the available range. Stack describes the height of the top of the head tube relative to the bottom bracket. Spacers, stem and bar shape establish the remaining position. A low frame cannot be raised indefinitely by adding more components above it.
Your body and riding goal matter just as much. A position for a short effort may not suit a long outing. Fatigue, movement space and being able to look around safely remain part of the assessment. Low handlebars do not prove that a bike is well fitted to its rider.
Online advice is therefore a starting point. It can organise your proportions but cannot observe braking under load. It also cannot establish your particular fork's structural limits. Follow the instructions for frame, fork and stem whenever you change their mechanical arrangement, even for a small comfort adjustment.
How to approach it
-
Stand the bike upright on a level floor. Check that both wheels occupy their normal positions. Use a tape measure to record the height of a fixed point on top of the saddle.
Then measure your selected point on the bars. Use the same points each time and record which hand position you mean.
-
Subtract bar height from saddle height. This gives drop according to your measurement method. Photograph the reference points so you do not later use a different saddle edge or bar curve.
Compare other riders' figures only when their method matches. A number without measurement points provides an incomplete comparison of positions.
-
Check your posture before loosening anything. Sit normally on the saddle and hold the brake hoods. Look ahead, bend your elbows slightly and confirm full brake operation.
Assess the drops too if you plan to use them on the road. Do not persist with a position that restricts your view or control.
-
Choose one safe trial. Raising the stem with a 5 mm spacer can be a practical experiment, not a universal recommendation. Use only permitted spacer arrangements and correct installation.
A cut steerer does not automatically provide extra room. Ask a mechanic when instructions, clamping space or torque requirements are unclear to you.
-
Ride two or three easy outings of comparable duration. Record neck tension, hand pressure and use of different hand positions. Improved comfort without lost control matters more than a low silhouette.
Return to your previous setting if symptoms increase. Do not change saddle height during the same comparison, or you will mix effects.
-
Discuss adjustment limits with a fitter if you repeatedly need more height. Suitable frame geometry may matter more than another component. Stop for radiating pain or numbness.
Seek medical assessment for pain at rest, night pain or swelling. Persistent symptoms after three or four careful adjustments call for an individual review.
Further reading
Neck pain cycling: relax your shoulders helps investigate the relationship between your view, shoulders and the distance to your hands.
Bike fit tall riders: where to start discusses a high saddle without automatically choosing a longer frame.
Saddle setback and tilt adjustment helps establish stable support before comparing handlebar heights on your bike.
The bike fit calculator offers a starting point for the complete position, alongside your own measurements and riding experience.
Frequently asked questions
Is there an ideal drop for everyone?
No. Your proportions, movement range, handlebar shape and riding goals differ from another rider's. A useful number describes a position you can control and maintain. Do not copy a height difference without also checking saddle position, hand placement and your ability to operate the brakes safely.
Can I simply put every spacer below the stem?
Only if the instructions for your fork and stem permit that arrangement. Allowed height and clamping position vary with construction. Check cables and hoses after adjustment too. Have the installation assessed if uncertain; a wish for more comfort does not override a component's mechanical limit.
Are higher bars always slower?
Height alone cannot establish that. Your complete posture and the power you can comfortably produce also matter. A position you cannot maintain has limited practical value. For your own rides, assess control and comfort first, and compare performance only under conditions that make a fair comparison possible.
Should I lower the saddle to reduce drop?
Not if saddle height already suits your pedalling movement. That would change another contact point to hide a handlebar problem. Establish saddle position first, then investigate the bars. Keeping each trial separate makes it easier to understand which adjustment improves or worsens your comfort while riding.
This guide covers one part of your riding position. Read how bike fitting connects your measurements and bike setup.
Use your measurements to check your current riding position systematically.
Check my starting position